First things first...Merry Christmas! Hope your day was wonderful.
Now the explanation.
Yup! Shot my kid in the eye. "Mother of the Year"...that's me!
Before you go freakin' out too much it was with a Nerf gun. And it hit her in the corner of her eye. Close range though. Maybe she should have been wearing her safety glasses. Ya, that's it. Deflect the blame.
She has really matured lately. I expected her to milk it for all it was worth but she didn't. She acted suitably injured in body and spirit and then got over it. She is a great kid.
What near disaster can I plan for her birthday? Stay tuned to find out.
Karen

11.22.2011
Thanksgiving Decorative Plate
I wanted a little something new for our Thanksgiving decor this year. So I purchased a pretty plate from Tai Pan Trading and using my Silhouette, whipped out this little baby in about 5 minutes.


I am very thankful for Hammie. She is a wonderful person. Generous and kind. A friend that loves unconditionally. Friends like that are hard to find. What a lucky person I am.
I hope you all have a wonderful Thanksgiving.
Karen

I liked it so much I made another for my friend, Hammie.

I am very thankful for Hammie. She is a wonderful person. Generous and kind. A friend that loves unconditionally. Friends like that are hard to find. What a lucky person I am.
I hope you all have a wonderful Thanksgiving.
Karen
10.26.2011
Gosh, I hope I win!
So I was checking out one of my very favorite, check it everyday blogs, Flamingo Toes, and I read about the awesome accuquilt giveaway.
Very cool. I could make some fun stuff with that.
I was going for as many entries as I could so I visited the accuquilt website to check out the dies.
Lo and behold they have a bacon die! Oops. That is a rick rack die, not bacon. But can't you see it too? It could easily be bacon. And if I win I will make a bacon shirt. Because I like bacon. A lot.
You should enter too. Go on, you know you want to.
Good Luck!
Karen
10.20.2011
Plain to Pretty Purple Tee
A very long time ago, at least 10 years, I gave my mother-in-law a purple T-shirt that I had embellished with embroidered silk ribbon flowers. She loves it. And still wears it even though many of the stitches are worn through and falling apart.
So I guess it's time for a new purple T-shirt.
This time with a more updated look. A cluster of little felt flowers at the neckline.
This is the tee I started with. I love the softness of the neckline.


My daughter,O, tells me I have trouble being random. It's true, but I gave it my best shot and arranged the flowers in what I hope is a pleasing and suitably random fashion.
(wow, lookie at that color difference!)

Using two strands of embroidery floss I stitched each flower to the shirt with five small "spoke" stitches and a french knot in the center. It needed more sparkle so out came the bead stash. I stitched a cluster of three purpley-pink (oh yes, that is a color) seed beads to four random flowers. O will be so proud!

Hope she likes this new one as much as the first! She'll be visiting soon. Maybe I can get her to model.
Stay tuned!
9.29.2011
A Halloween Treat...but Not to Eat!
Give your special Trick or Treaters a fun Halloween treat that won't rot their teeth. Shaped crayons are fast, fun and easy to make. Dollar stores, grocery stores and even thrift stores are a great place to find inexpensive ice cube trays with holiday shapes. Candy molds work well too.
You will need:
Crayons I picked up 10 boxes for $2 at Target during their back to school sale
Ice cube tray or candy mold
Craft knife
Paper cups One for each color
Cookie sheet
Craft stick or skewer to stir the melted crayons
Parchment paper (optional)
Foil
Oven
Preheat your oven to a low setting, 225 to 250
Line your cookie sheet with parchment paper if you want. This is just to protect it from spills.
 Peel your crayons.
I found they peel much easier if you use a craft knife to slit the wrapper down the side.
 Break the crayons up into pieces and place one color in each cup.

Place the cups on the cookie sheet and put the cookie sheet in the oven.
While your crayons are busily melting away, lay a piece of foil on the counter and place your trays or molds on it. The foil should be large enough to protect your counter from spills. You want your molds to be as level as possible. (Pretend that I used foil, which I didn't and my spills soaked through and I had to scrub my countertop to remove the colored wax. Yuck.)
 After about 15 minutes, take a peek at the crayons. Give them a stir with a craft stick or skewer to check for lumps in the bottom of the cup. If there are lumps, return them to the oven for about 5 minutes more. When all the crayons are melted, remove the cookie sheet from the oven. Let everything cool for about 1 minute. The top edge of the cup should be cool enough to handle. Please be careful. This is supposed to be fun, not painful. Pinch the edge of the cup to form a pour spout.

Pour your melted crayons into the design of your choice. Fill the design to the top. As the crayons cool and harden again you will get an indentation in the middle. Reserve some of the melted crayons to fill in any dips in the center. I leave my oven on, with the cookie sheet and cups in it while the molded crayons cool. Then it's easy to fill in the dips as they form.

Let the crayons cool completely and then just pop them out of the molds.

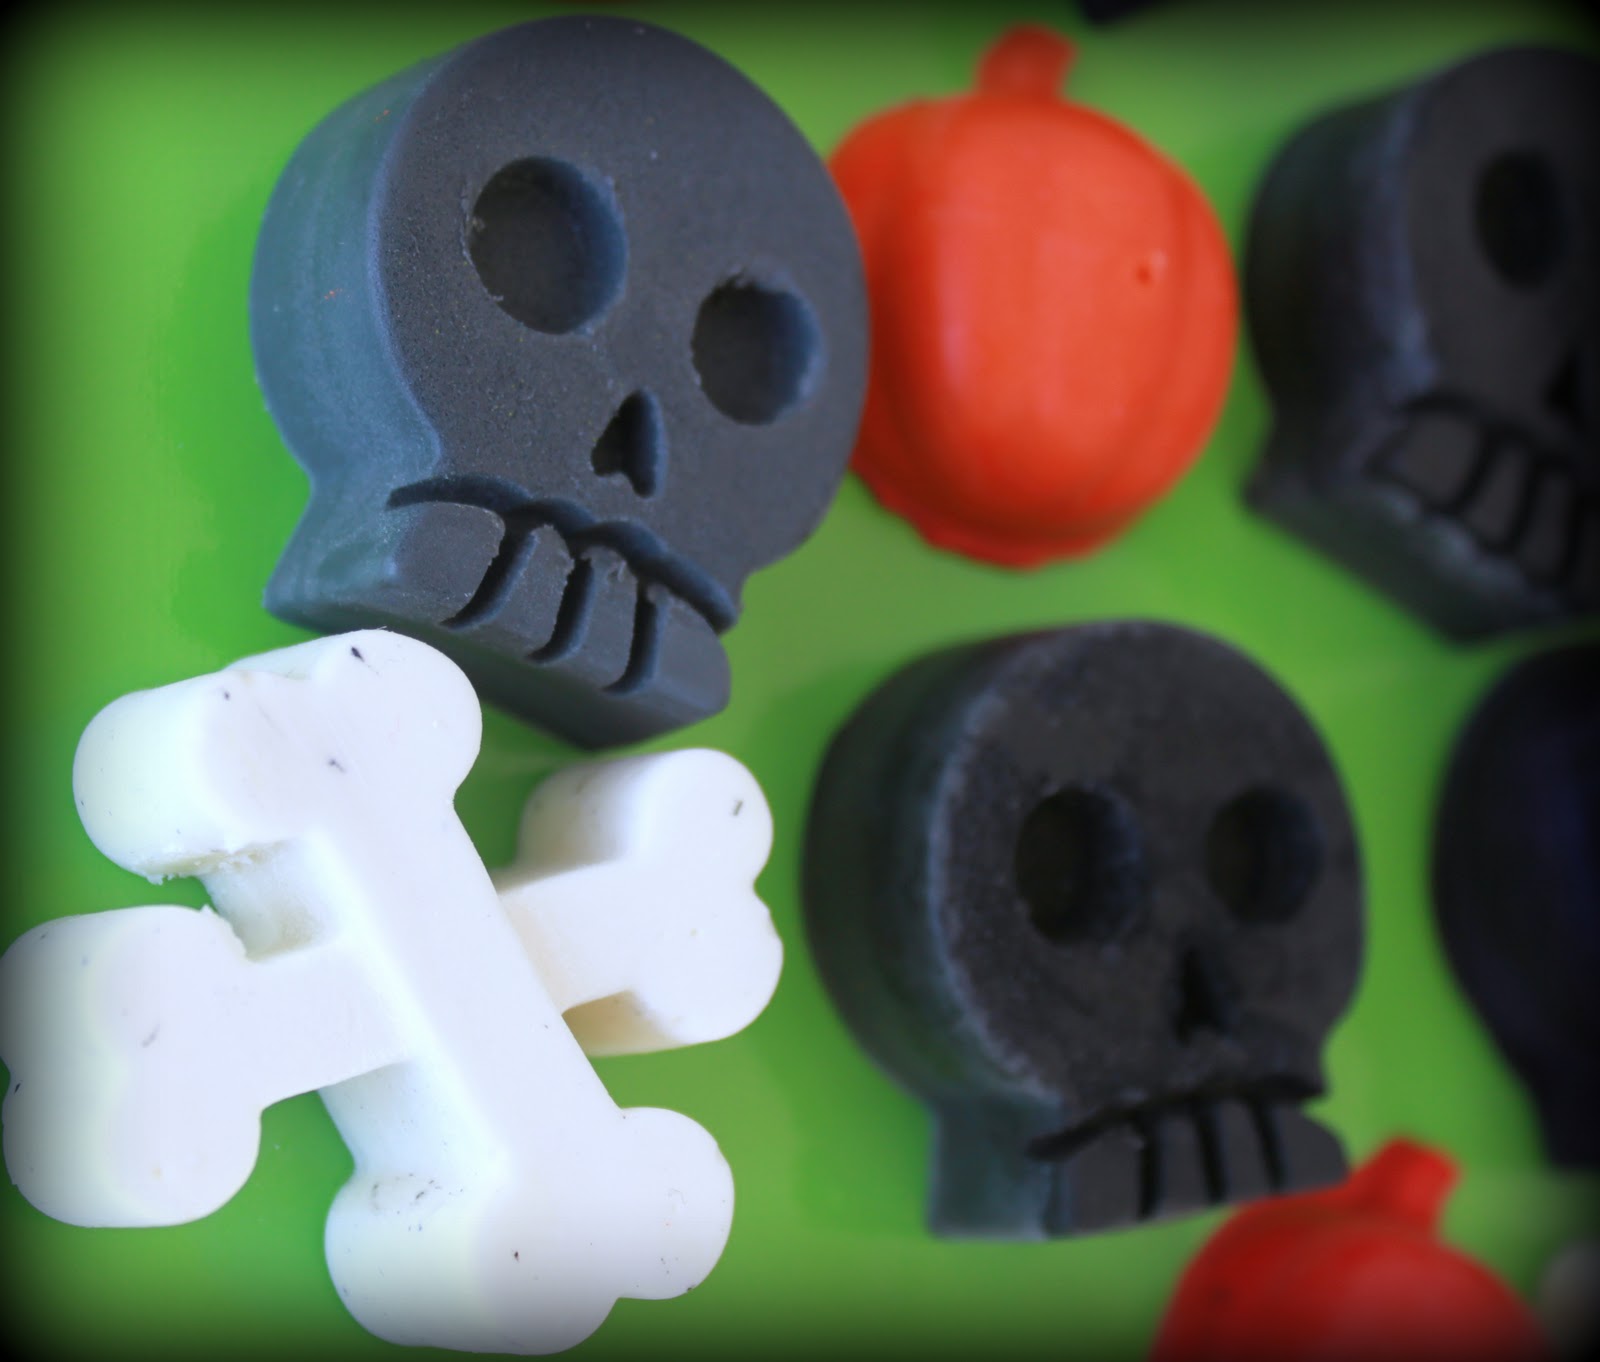
My pumpkin mold was not very deep so it only took about 2 crayons to fill each section. The skeleton and bones were 3/4" deep and it took about 5 crayons to fill each section. I love the detail of the skeletons! They have great teeth and eyes.

Now color! Coloring is so relaxing and fun. By the way, the awesome coloring page is from Faces Faces Everywhere by Yukiko Kido. And yes, I bought it for myself. Because I'm a grown up and I can.

Hope you enjoyed the tutorial! If you try it out, please let me know how it goes for you. Comments are always welcome.
Thanks!
You will need:
Crayons I picked up 10 boxes for $2 at Target during their back to school sale
Ice cube tray or candy mold
Craft knife
Paper cups One for each color
Cookie sheet
Craft stick or skewer to stir the melted crayons
Parchment paper (optional)
Foil
Oven
Preheat your oven to a low setting, 225 to 250
Line your cookie sheet with parchment paper if you want. This is just to protect it from spills.

I found they peel much easier if you use a craft knife to slit the wrapper down the side.


Place the cups on the cookie sheet and put the cookie sheet in the oven.
While your crayons are busily melting away, lay a piece of foil on the counter and place your trays or molds on it. The foil should be large enough to protect your counter from spills. You want your molds to be as level as possible. (Pretend that I used foil, which I didn't and my spills soaked through and I had to scrub my countertop to remove the colored wax. Yuck.)


Pour your melted crayons into the design of your choice. Fill the design to the top. As the crayons cool and harden again you will get an indentation in the middle. Reserve some of the melted crayons to fill in any dips in the center. I leave my oven on, with the cookie sheet and cups in it while the molded crayons cool. Then it's easy to fill in the dips as they form.

Let the crayons cool completely and then just pop them out of the molds.

My pumpkin mold was not very deep so it only took about 2 crayons to fill each section. The skeleton and bones were 3/4" deep and it took about 5 crayons to fill each section. I love the detail of the skeletons! They have great teeth and eyes.
Now color! Coloring is so relaxing and fun. By the way, the awesome coloring page is from Faces Faces Everywhere by Yukiko Kido. And yes, I bought it for myself. Because I'm a grown up and I can.

Hope you enjoyed the tutorial! If you try it out, please let me know how it goes for you. Comments are always welcome.
Thanks!
Hopefully (crossing my fingers) I will be linking to Think Pink Sundays at Flamingo Toes. Since this is all new to me and I am technically challenged, we'll see what I can do.
9.16.2011
The Older Man
My friend Hammie’s youngest daughter started kindergarten this year. In the mornings she has her older sister to watch over her on the bus. In the afternoon, each new kindergartener has a fourth grade “bus buddy” whose responsibility it is to make sure their little charges get on the correct bus home. As Hammie was telling me about her daughter’s “bus buddy” my mind drifted back to my kindergarten year and… The Crossing Guard.
I don’t remember his name but I do remember how handsome he looked with his sexy crossing guard sash and what appeared to me to be a full size Stop sign, waiting for me us outside the classroom each day. He was in fifth grade, older, but still a very achievable man in my eyes. I knew that if I could just get his attention he could be mine.
And I had a plan. Not a good plan, I was only 5, but still a plan. Every day I would run as fast as I could to be first in line behind The Crossing Guard. Most days I made it. This netted me extra gazing time as we waited for the other kids to get in line. I say “we” like it was a team effort, me and my man, The Crossing Guard. I would make lame attempts at conversation and he would nod his head at me. Oh yea, he was mine!
When everyone had lined up, The Crossing Guard would lead us up the hill to the intersection where some kids would need to cross. I didn’t need to cross that street so I would linger a minute or two, watching for any love signs and then walk the rest of my 10 miles, uphill both ways, in the snow, journey home. No really, I thought it was a super long way. Turns out it was only a quarter of a mile.
Then one special day, I got the attention I so desired from my man. This was not just any day, this was the day our paper mache’ Easter eggs were dry enough to take home. Yes, God was still allowed in school then. I clutched my exquisite egg to my bosom and ran to my man. And tripped, landing squarely on top of my beloved egg. Ever the gentleman, The Crossing Guard came to my aid, gently helping me up.
I was devastated. How humiliating! Not only did I klutz out in front of The Crossing Guard, but I popped the balloon inside my egg! I could hear it rattling around in there. I had no idea at the time that it didn’t matter if the balloon popped. I had killed my egg and my chances with my man. Sobbing like the big baby that I was, I went to the back of the line. No gazing for me that day. Or any day after that.
I don’t remember ever running to get in line again. I was too embarrassed to face him.
Ahh, young love. I certainly don’t miss it.
9.14.2011
I'm Ready!
Last night I boldly proclaimed to my daughter that I was ready! Ready to start my blog. Her skeptical look cast a slight pall on my enthusiasm. She knows me well.
I start things and never finish. I am technically challenged and have been known on several occasions to shout at the computer so loudly that our dogs hid under the bed. I have a sense of humor similar to that of a 13 year old boy. Goofy. Unfiltered. Sometimes inappropriate.
But I will not let these things slow me down. I shall forge ahead into the Blogosphere and share my thoughts! Heaven help us all.
Subscribe to:
Posts (Atom)